
If you have been following the previous posts in this series you should have a basic NEXT.js site, including reusable components as well as some basic styles using Tailwind CSS. The next steps to expand on the project will be:
- Create a strongly-typed object to represent site content as a post.
- Set up content directories and create your first markdown file.
- Create functions to read/return your markdown content.
- Add a dynamic list of posts to your home page.
For this site you are going to be creating a Content Management System (CMS) style setup, but instead of using a database for content you will be creating posts (articles) using Markdown. There is a comprehensive example of doing this in a NEXT.js project provided by the Vercel team - the steps below are a simpler version of the same process. The intention of this walk through is to give you an understanding of how to set up this functionality/focus on the basics of reading and displaying content from markdown files. From that point you should be in a good position to start incorporating your own ideas into expanding the solution with new features.
Create a Post Type
For starters we are going to create a new Type object to represent a post in your site. From the root of your project folder, create a new folder called types. Add a new file called post.ts to the folder.
Open posts.ts and add this code to the file:
type Post = {
slug: string,
title: string,
created: string,
author: string,
content: string,

}
You have now created a new Post type with five basic fields. The slug will be used to uniquely identify the post, and the other fields represent the post content and information about the post.
Content Directories and First Markdown File
Next create a directory to place your posts; each post will be represented by a single markdown file. In VSCode explorer, create a folder called _content in your project's root directory, then create a directory in _content called posts. Then create a new file in the _content/posts directory called first-post.md
Open the first-post.md file and add the following content:
---
title: 'First Post'
created: '2022-08-01T00:00:00.000Z'
author: 'developer person'
---
First Post Has a Title Included
Reading and Displaying Posts
Now you are going to create a set of functions to enable reading the list of posts in your content folder and also return content from specific posts. The markdown file above has three dashes at the beginning and end of the properties related to the post. The functions you create will read this information; in order to parse the data correctly you will need to add a parser called gray-matter to your project. You can install gray-matter from the VSCode terminal window in the root of your project by running this command:
npm install gray-matter
Add another static variable to your application that will be used to specify where to find your posts. Open the file lib/constants.ts and update it to:
export const SITE_NAME = 'My Site';
export const POSTS_DIRECTORY = './_content/posts';
Create a file in the lib directory called api.ts. Update the api.ts file to look like the below:
import fs from 'fs';
import { join } from 'path';
import matter from 'gray-matter';
import { POSTS_DIRECTORY } from './constants';
const postsDirectory = join(process.cwd(), POSTS_DIRECTORY);
export function getPostSlugs() {
return fs.readdirSync(postsDirectory);

}
export function getAllPosts(fields: string[] = []) {
const slugs = getPostSlugs();

const posts = slugs
    .map((slug) => getPost(slug, fields))
    .sort((p1,p2) => (p1.created > p2.created ? -1 : 1));

return posts;

}
export function getPost(slug: string, fields: string[] = []) {
const realSlug = slug.replace(/\\.md$/,'');
const fullPath = join(postsDirectory, `${realSlug}.md`);

const fc = fs.readFileSync(fullPath, 'utf8');

const {data, content } = matter(fc);

type Items = {
    [key: string]: string
}

const items : Items = {};

fields.forEach((field) => {

    if(field === 'slug') {
        items[field] = realSlug;
    }
    if(field === 'content' ) {
        items[field] = content;
    }

    if(typeof data[field] !== 'undefined') {
        items[field] = data[field];
    }
})

return items;
The API now contains the three functions that will be used to read content:
getPostSlugswill read the file names from the _content/posts directory and return them as a string array. Ex. first-post.md would be returned as first-post; this will be the slug property used to uniquely identify each post.getPostreturns the parsed content of a single markdown file using gray-matter and returns it as a key-value pair array.getAllPostsreturns an array of all posts based on the content directory; this function identfies all of the content (getAllSlugs) in your directory and returns the content for each (getPost) as an array. The resulting object in this function will be a list of posts.
The last step will be to update your home page to display recent posts. Open pages/index.tsx and update it as shown:
import { SITE_NAME } from "../lib/constants";
import Head from 'next/head';
import Container from "../components/container";
import Layout from "../components/layout";
import Post from '../types/post';
import { getAllPosts } from '../lib/api';
type Props = {
postsList: Post[]
}
export default function Index({ postsList }: Props) {
return (
<>
<Layout>
<Head>
<title> { SITE_NAME } Home Page</title>
</Head>
<Container>
<div className="w-full">
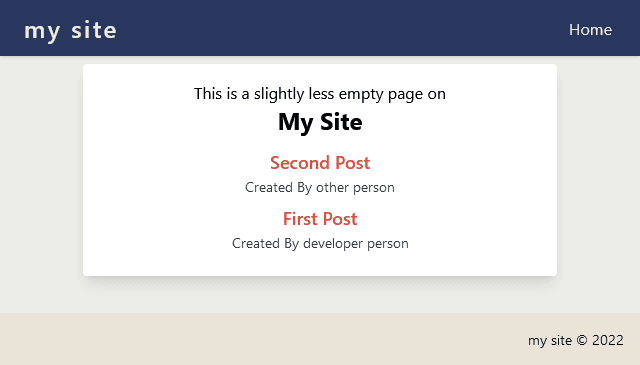
<div className="lg:w-4/12 mx-auto p-5 text-center">
This is a slightly less empty page on
<h2 className="text-1xl font-bold">{SITE_NAME}</h2>
</div>
<div className="container mx-auto border rounded shadow-lg bg-mysite-light p-3 m-2">
{ postsList.map((post) => (
<div key={ post.slug } className="mb-2">
<h3 className="font-semibold text-lg">{ post.title }</h3>
<p>Created By { post.author } </p>
</div>
))}
</div>
</div>
</Container>
</Layout>
</>
);
}
export const getStaticProps = async () => {
const allPosts = getAllPosts([
'slug',
'title',
'created',
'author',
]);
/* return five most recent posts */
const postsList = allPosts.slice(0,5);
The key changes in index.ts that enable the home page to show the list of posts are:
type Props{...identifies a collection of Post type items.function Index({ postsList }: Props)passes the collection of Post items into the page for rendering.postsList.mapin the return function renders any of the data contained in the posts collection.getStaticPropsis a NEXT.js function to render a page from the server at build time.
In order to fully verify the post list is working, create a second markdown file in _content/posts/ called second-post.md. Add the following to the new file:
---
title: 'Second Post'
created: '2022-08-02T00:00:00.000Z'
author: 'other person'
---
The Second Post Comes First Because It Is Newer
Save the new markdown file and then run your project from the VSCode terminal window by entering npm run dev. Your home page should now look like this:
Member discussion: